Today James commented on my post suggesting I try out the firefly plugin on Grasshopper. Firefly allows you to use either vision or audio detection and translate that into a mesh or animation.
When first starting firefly I was able to set up the basics and follow the tutorial to create a mesh wall that would allow me to interact with it using my camera on my laptop. At first I messed around with the wall and changing the scale and quality of my camera to fit as well as allow my computer to handle the program.
I then moved onto the contrast and brightness and created sliders that would allow me to change my camera as the detection in firefly functions off the light detected in the image.
Finally I proceeded to make the animation through polygons and rotate 3d. Rotate 3d will allow me to change the axis and angle of the rotation of the polygons based off the movement from my webcam.
This was the final step and with all this put together I attempted to create the mesh but it didn’t seem to work. The polygons were detecting movement but they weren’t detecting the right light on my webcam and face. I attempted to troubleshoot but due to my lack of knowledge I wasn’t sure how to fix.
Screenshot of mesh wall and Grasshopper setupHow the tutorials mesh turned out
Above is the final stages of the mesh where it was perfectly reacting to his webcam and movement. By watching the video over the only explanation I can come to was the lighting in my room, a solution I am going to try is to do it during the bright hours of the day. Although my attempt was a failure I am glad I did this tutorial because it has taught me the basics of firefly and how I can use that to create motion or audio tracked reactive mesh’s and animations and this is a very useful and powerful tool to have an understand.
Over the holidays I wanted to learn some more Rhino 7 as well as learning Grasshopper the rhino 7 extension
Grasshopper allows you to use mathematics and geometrics to great organic shapes and meshes. Grasshopper is a very useful and powerful within rhino and I am going to continue to work on my skills and learn more about this widely advanced software.
Below is my first attempt at making a geometric mesh and animation using grasshopper in rhino.
Above are the commands and nodes I used to create this animation. I was able to learn how to make Voronoi 3d meshes and using number sliders and directional anchors to create the animation though the cube. It is a very simple animation and render but its a start and I am excited to progress further and make some larger and more advanced renders using grasshopper.
I am happy with this small piece of work as it shows I am learning a new software but I also know I can push myself a lot further and make something more complex and advanced. I am going to look into larger scale animations that will create a reaction within the viewer and spark emotion.
Today I had a talk with Ziggy and we had a brainstorm about some more ideas for my making to do with Rhino 7 and we came up with some ideas to relate to board games as my first experiment was making a set of dice. I had a think after our meeting and thought I could play with scale especially with game pieces as they’re generally set at 1 size and are common knowledge so I wanted to push that boundary and break out of the norm.
Today I gave a chess piece a go to break out of the square shop of a dice and work more with curves. I believe my creation was successful but I still need to push myself harder when working in Rhino and Push the limits of the program and in my making.
I then printed the model and scaled it up to push out of the norm of a small pawn chess piece to make it large scale and eye catching as shown below
Final 3d Print
I recently switched black filament and am very happy with the quality and the condition of the 3d model and print. I am going to continue to push this boundary of scale and break out of the norm.
Ziggy Showed me an artist named Céline Condorelli and one of her artworks caught my eye immediately and related to my practice as well. She did a piece on “limits to play” the work challenges the femininity of woman being allowed to play sports in public but I am going to interpret differently into my work in how I can manipulate and morf a game piece to challenge the expectations of what that iconic piece has come to be today.
After my meeting with James where we decided it was a good opportunity to learn a new software program for 3d modelling. The program I am going to be working with is Rhino 7. The reason behind this is because it is a very commonly used program throughout AUT and the my course, it will allow me to break through and create my 3d models and then print them out on my 3d printer at home.
First Render
Above is the first small 3d model I made. I decided to just go for dice as they’re an easy shape and it will allow me to get familiar with the program and I will move onto more complicated stuff tomorrow and later in the week. after I made this 3d model I exported it into and OBJ file and put it into Cura Slicer and printed it out overnight for class tomorrow.
3d Printed Dice
I am happy how the print came out, but my 3d modelling does need some tweaks as the dice is very squared in comparison to other dice. I will continue to go through Rhino 7 tutorials today and continue onto more lager and complex models.
Today I rummaged through my very small apartment looking for some items and looking for a suitable place to make my crafts. Below is an image of my space, it is small but I can rearrange furniture to give me a clean clear working space.
Available working area
Materials
Black Cardboard x1
Cardboard boxes x2
Pringles Cans x3
Wooden Picture Frame
Square Wooden Plank
Light Bulb
Round Wooden Plank
Various sized wooden cylinders x10
Black Acrylic Sheet
Cans x50+
Tools
Masking Tape
Wood Glue
Craft Knife
Kitchen Utensils (sharp knifes, forks, etc)
Ruler
One thing to note is I also have access to my own 3d printer and rolls of filament that I can use within my art processes as well.
Something that really caught my eye while reading through this text was the scale of these sculptures and drawings, yes some of them were smaller instillations but others had structures and resemblance of architecture. The relationship between architecture, sculpture and landscape has been labelled the complex throughout the text and argued to remain excluded from Renaissance art. The Expanded Field allowed sculpture to not be a middle term of the two things but to become one term where there are many structured possibilities. One of the sculptures that reminisced in me with this point was Robert Morris’s Observatory. The Observatory was compared to the Natural prehistoric monument Stonehenge by Morris himself(1). This comparison showing even Morris saw the landscape used within the architecture. The black and white image in the text is hard to tell but on further research it shows the Observatory is made out of the land and grass around it.
(1) https://www.landartflevoland.nl/en/land-art/robert-morris-observatorium/ Observatory (1977), Robert Morris
Drawings
The idea behind this drawing was to give my clay sculpture emotion while also bringing the nowness of todays lifestyle and society into the model. Instead of giving my clay model emotion I decided to use one of the most common forms of protection in todays current day and age due to the pandemic, to represent the norm of human representation.
This drawing is using an old piece of my prescription glasses. The purpose of this was to signify and represent what its like when I am not wearing my prescription glasses. So when the viewer uses the glass it impairs their vision like my vision is impaired when I am not using my glasses.
The purpose behind this drawing was to use the leftover tape that I didn’t use on the previous drawing as I didn’t want it to go to waste so i recycled it into another drawing.
The image above shows a recycled VR headset I had at home that I removed the front off of because the little eye sockets also impair your vision so it is another drawing and another concept similar to the one based off of my glasses. This one can also signify the depth perception that people going blind or with impaired vision go through on a day to day basis.
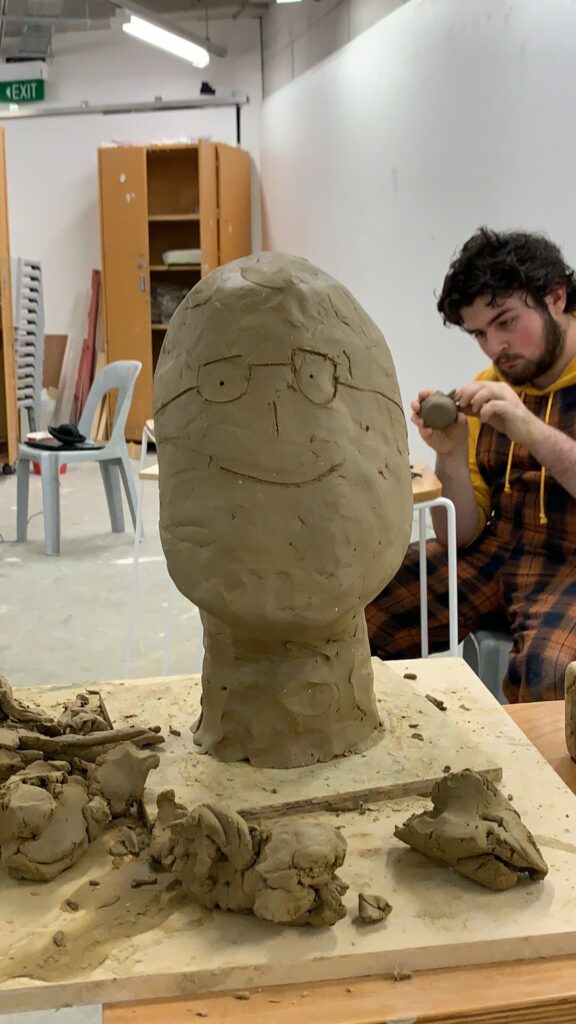
This I started off by working on my clay modelling and adding the ears and the hair. I was struggling with the hair as it is hard to get it exact due to it being one solid clay from whereas the hair is more split and spread out on my model. After roughly finishing the hair I was instructed to move on to my drawings.
I will occasionally continue to work on my clay model and work on they eyes and the muscles structure of the face as well as finish off the hair.
We were given the 3rd part of the brief where we need to make 5-12 drawings that question representation and the notion of artworks within sculpture.
The current ideas I have are shown below are some small sketches of larger drawings I am going to do throughout the next few days for the critique on Tuesday next week.
I did 2 of my drawings today shown below and will continue tomorrow and during the weekend on a few more to reach my minimum of at least 5.
The image above is the process of me making my drawings and the setup behind it. The original idea was to have a natural drip into the bucket but due to time and weather restrictions that was not possible. If I develop this drawing further I will take that step to use nature as apart of my sculpture.
Another one I have started working on is my 3d print of the 3d scan of my film camera I made. The idea behind this drawing was to challenge the expectations of an art piece and how it has to be perfect where as in fact art doesn’t need to be perfect to be good. I also developed the idea to take photos using different methods of the 3d printed camera in the same position. For example; film, digital, polaroid and pinhole. I believe I don’t have enough time to complete all of these but I will complete as many as possible.
This week I am planning on improving on my facial features and adding cheeks, muscles, a mouth and ears to my sculpture. We also started the 3d scanning brief which I enjoyed and am excited to continue down that path.
Some improvements I need to make per James’s request was to make the eyes more of a ball shape in a socket and also mold the cheeks into the nose. I am also gonna add some ears to my sculpture so I can start and improve on hair and head shape.
This week we also did our 3d scanning which I really enjoyed. There was a little bit of a problem with the software regard 3d but I was able to use my previous experience to allow me use a different program called meshroom that did a similar thing. I did 2 scans shown above 1 of my film camera and one of an NFL ball. I submitted the film camera to James as even though it isn’t a perfect scan it shows the nature and the character of the object through the messiness and imperfections.
An artist model I have found that is amazing at this and I will use to inspire me and guide me through the coming weeks is Daniel Arsham. Daniel is a artist from Cleveland who made a name for himself by challenging expectations and understanding the space of the art world.
This is the reason why I chose the Cleveland artist is because his work and my work are similar in the fact that they are distorted and not perfect and challenging the expectations of the art world that it has to be perfect when it doesn’t. This idea is reflected greatly throughout his work.
Further into my artwork I am going to do a similar piece like this using my film camera and my 3d scanning and a proper make and mold of the same camera.
This first week started out as a bit of a struggle. As I have never done clay sculpting I was very new and unfamiliar with this form of sculpting. I was really struggling with getting used to the gravity of the clay as my face model kept drooping down and not holding its shape while I was building it. This was very frustrating as I would shape the face how I wanted it and then it would slowly deform and I would have to repeat the process.
Nearing the end of the week my model was looking like this and I was not happy with it. I wasn’t sure how to fix it at first but after some time sitting I realised I needed to fix the chin and angle the face better.
After fixing the chin and the forehead I needed to get photos of my model to start sculpting into the clay
I slowly started working my clay to look like my model
At the end of the week I had completed the eyes and the nose and was ready to move onto the mouth and the cheeks next week, as well as fixing up and refining the eyes and nose to fit the rest of the face.
In an article from understandinguncertainty.org, The author writes about artists using randomness in their art.
Cage at Kettles Yard
One of the artists, John Cage, speaks about whys he uses randomness in his art: “I use chance operations instead of operating according to my likes and dislikes”
“The Kettles Yard exhibition featured wonderful film of assistants reading computer-generated random numbers off a list which determined which of a row of stones were to be chosen, which brush to use, and the position of the stone on the paper; Cage finally paints around the stone, stands back and announces the results as ‘beautiful’.”
“Gerhard Richter’s “4900 Colours: Version II”. This is based on 196 panels each comprising a 5 x 5 square. A computer program assigned a colour to each square drawn at random from a palette of 25 colours. The 196 panels can be put together to form one huge display, or in the Serpentine exhibition were arranged at random in sets of four to form 49 10x 10 displays.”
It’s interesting how art made using randomness can look so deliberate. We are hoping that we can emulate this experience in our exhibition.
We also found some great quotes In David Kirsh’s paper “The importance of chance and interactivity in creativity” speaking about this subject.
“Chance has a privileged role in creativity. It can be used to thwart bias, overcome the drive to imitate past solutions, and stimulate new ideas”
“Creative thinking, whether in science, art or sensemaking, is not something that occurs solely in the head — the internalist view. In most cases, creativity depends on an interactive cycle of working with artifacts, reacting to interim changes in the environment and then interacting again.”
“Creativity does not happen in a situational vacuum”
“The power of chance lies in its departure from tradition. It releases us from predetermined ideas about the good that constrain our vision of the possible. Too often predictions about what will be a good idea are unreliable”
Reflection
After individually experimenting with our own art machine ideas, we have spent the week talking about how we can collaborate and connect our ideas. We decided on the idea of an art factory, where viewers can try some of our art machines to create their own art.
The main ideas of our exhibition are art processes with unknown outcomes and environments that confront us with new ideas. Our installation is interactive to inspire the viewer to challenge their preconceived ideas about art making and outcomes.
Our goal was to create an experience of thought and experiment. We invite the viewer to let go of rigid ways of art making and let chance decide the outcome. It was important to us that the result of the viewer’s interaction with our work would be mostly random and out of their control, that they relinquish the control we often try have over our art process
Kayla Abbott
They first enter our art factory to see a dimly lit room illuminated by a large red lantern. It gives off a childish, dreamlike atmosphere. This sets the mood and helps the viewers/participants see the space as a place of play. They are then presented with paper and paints to use on the various machine
Machine 1 – Benjamin Cloke
I enjoyed the Art Machine brief as it pulled me out of my comfort zone and think out of the box to make new ways to make art. I think it benefited me working in a group as it allowed me to open up and share my ideas as well as taking in ideas from others to help improve on my artwork and process.
My idea for an art machine was to use my fan and attach a canvas to it and put paint on the canvas causing it to spin the canvas and spread out the paint at random to make an art piece. The original idea came from the spin art used by drills but I wanted to add my idea to it and make it so it was easily usable by others when it came to presenting.
How it is attached
I attended a couple of workshops throughout this journey but the one that most benefited me and the group was the Performance Machines workshop as it opened us up to the idea of an interactive presentation where people could come around our stations like an assembly line and make a piece of art with all of our creations and machines.
The Journey
My Machine started very simple with just a canvas attached to the fan and spinning paint around.
https://youtu.be/fG1hA599EeY
Results
I was in love with the results but, the machine still needed some tweaking as it made a mess all over my clothes and on the floor. So Josh and I attempted to hold up some paper to stop the paint splattering all over the room like the first attempt.
https://youtu.be/yBQmP1m7sJ0
Results
This time was more successful in the way the paint didn’t go everywhere but there wasn’t enough paint to cover the canvas as I had intended so again it needed some tweaking.
I then decided to make it more easily accessible it need a cage or something that would stop the paint from spraying while still being able to function. Josh and I brainstormed and came up with a cage idea to wrap the fan up in paper supported by wire and it would act as a protective layer to stop the mess being made.
Paper Cage
Finally, I did some fine-tuning to the Machine to get it ready for the presentation on Thursday. For the presentation, we allowed those who came in to be a part of our creations and make something of their own. I believe this was very successful in the way all of our machines came together to make new pieces of art amongst those in our class and close community. The response from students and lecturers were overall pretty happy and enjoyed our presentation so I believe it was a success. (Examples Show Below)
Pieces of art created by others
One way I could improve if we had more time in the brief was to make the cage better and out of a better stronger material like cardboard or wood instead of just out of paper and wire. This improvement would have given my work a finished look and a more professional and finished feel to it.
Artist Models
Damien Hirst was my main artist model throughout this brief as he is a very successful abstract artist and is very famous for his spin paintings as they are very finished and very successful in the way he creates them. One thing Damien does that I wish I was able to do was the scale, my art pieces were very small and restricted due to the size of the fan and the machine I had created. Damien also uses round canvases that work very well as I use square canvas. So as I viewed Damien’s work throughout I have noticed things I could improve on to make my artwork better, fine-tuned and professional.
Damien Hirst
Machine 2 – Dice Portig
Machine 3 – Josh Whittaker
The overall experience is supposed to be fun and unexpected, similar to the way a child interacts with art making. Looking at art more childishly can be a great way to generate new ideas.